
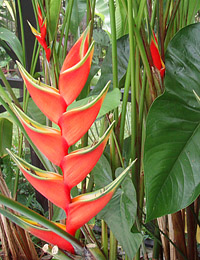
HELICONIA RECEIVED IN A POT:
NOTE ON FOLDED/TRIMMED LEAVES:
Unlike many vendors, we will often ship Heliconia in a pot with stalks and leaves intact, and often the leaves will be folded over in the package and/or have trimmed leaves.
-Do not worry- this is intentional ![]() We always attempt to keep existing stalks on the rhizomes growing, and try to keep any stalks intact w/o cutting them down if possible.
We always attempt to keep existing stalks on the rhizomes growing, and try to keep any stalks intact w/o cutting them down if possible.
A Heliconia stalk can continue to grow new leaves and blooms even with cut/trimmed existing leaves and/or folded leaves. If a growing stalk can almost fit in the box, and we can fit it in by folding over the top leaf, we will do so- this way it is quite possible that stalk will continue to produce new leaves above the bent one once potted up. If a stalk with a folded leaf does *not* produce a new leaf after 3-4 weeks, cut it down 6″ above the soil. If the stalk *does* produce new leaves, you can cut off the bent leaf after at least one complete new leaf has unfolded.
Cut/Trimmed Leaves: Cutting a Heliconia leaf in half or in thirds will not hinder new growth on that stalk. We often trim back existing leaves on included stalks to conserve moisture during shipping and to reduce shock once planted. This is intentional.
Growing Instructions:
Since you received your Heliconia in a pot, you will not need to go through the rhizome rooting process.
All you need to do is continue to grow your Heliconia in its pot FOR A MINIMUM OF 45 DAYS, and then until you see roots appearing through the bottom holes. ONCE YOUR PLANT IS FULLY ROOTING OUT THE BOTTOM OF THE ORIGINAL POT, YOU CAN PLANT IN THE LANDSCAPE IF YOU LIVE IN AN APPROPRIATE AREA, OR POT UP.
Heliconia like sun, warmth and humidity. They dislike dry air and heavy winds.
Try to mimic these conditions to the best of your ability. If it is very hot and dry where you live (Arizona, etc) It will probably be best to keep the plant in a partial sun by noon, and near a water source for humidity (mister, etc)
Once roots are appearing, you can pot your plant up into a 3 gallon (10″) pot- OR wait until the plant is splitting the pot it came in, and then pot it up.
FERTILIZING:
Keep a layer of Osmocote on the top 1″ of the soil.
During the warm growing months, water with a liquid fertilizer (Miracle Gro, etc) at half-strength up to once per week.
Heliconia are heavy feeders during the warm months.
POTTING UP:
Don’t pot up into a bigger pot until the first one is pretty stuffed full of stalks and shoots.
Do not leave outside in temperatures consistently below freezing. Heliconias really do not like going below 32 degrees for any length of time- short overnight snaps are usually not a problem, but if temps will dip below 35 for many nights in a row, bring inside and keep soil on the dry side. A humid-air location is preferable (like a greenhouse or even a bathroom)
When overwintering indoors in drier air, keep an eye out for spider mites on the leaves. If you notice spider mites, spray them right away (especially undersides of leaves) with an all-season horticultural oil and repeat 4 days later and then 25 days later until all the mites and eggs have been killed.. Mites are usually only a problem in very dry air.. they can be avoided by spraying the leaves with water down to saturation often- (both top and bottoms)
A NOTE ON ROOTING HELICONIA IN WINTER/COLD AREAS:
Heliconia love tropical heat and humidity. They perform best when nighttime temps are above 50 and daytime temps are approx 75-95 degrees. Attempting to root Heliconia in colder conditions can be trickier as the plant growth will be slowed. Do not overwater in cooler conditions, as this will encourage rot, and the use of a HEAT MAT under the pot is recommended if the recommended temperatures above are hard to maintain.
Keeping the soil warm with a heat mat in cooler conditions will help.
Keeping the plant in a humid + warm greenhouse in cooler areas is encouraged.
A NOTE ON GROWING HELICONIA IN DRY / ARID AREAS:
Growing Heliconia in desert like areas (ex: Arizona) is possible- the heat is there, the main hurdle is going to be the HUMIDITY.
Do whatever you can to simulate tropical rainforest like conditions- regular misting can help. Box stores often carry standalone misters that can be attached to a hose and timer. a light rainforesty mist near the plant twice a day can help alot.
It is recommend to grow in an enclosed area where humidity can be contained and controlled.
Humidifiers do work, but need to be regularly refilled. You may find a mister on a timer is easier.
If you need to grow outdoors in a hot arid location such as Arizona, Palm Springs, etc – a more ideal location is on a patio with a misting system, with a part sun to very bright shade (since the sun is hot and intense)
In these arid areas, soil can dry out much faster- ensure the soil does not dry out completely for long periods of time- it still needs to be able to drain, but keep an eye on how fast it goes completely dry and ensure there is at least some moisture content at all times
Most importantly: Have FUN!